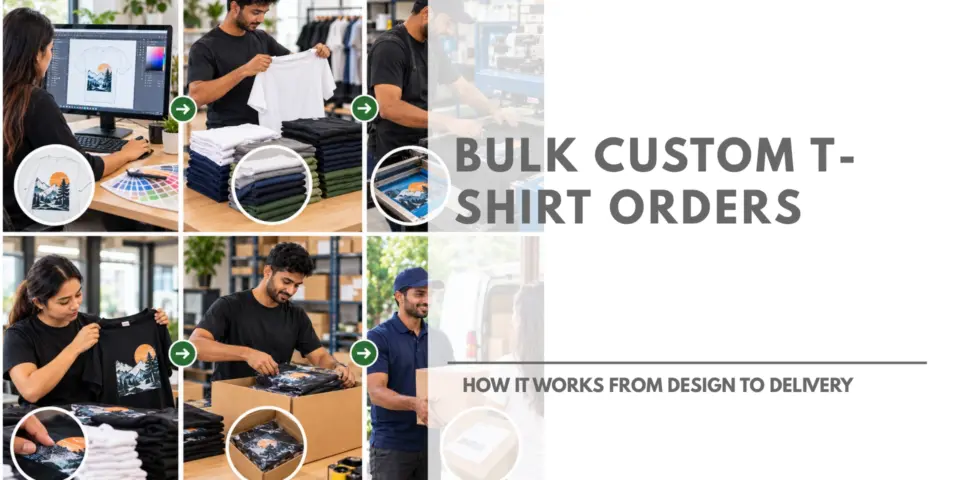
Ordering custom t-shirts for a team, event, school, or business can feel confusing at first. How many shirts do you need? What file should you send? How long will it take? If you have asked any of these questions, you are not alone. Bulk custom t-shirt orders follow a clear path, and once you know the steps, the process is easy. This guide walks you through each stage, from the first idea to the box at your door.
Step 1: Start With a Clear Plan
Before you design anything, decide what the shirts are for. A company event, a family reunion, a fundraiser, and a sports team all have different needs. Think about these basics:
- Quantity: Bulk orders often start around 12 shirts, though every printer sets its own minimum. The price per shirt usually drops as the order gets bigger.
- Budget: Pick a price range per shirt, then work backward.
- Deadline: Choose the date you need the shirts in your hands, not just the event date. Add a few extra days as a buffer.
- Audience: Are the shirts for adults, kids, or both? This affects sizes and fits.
A little planning now saves time and money later.
Step 2: Create or Upload Your Design
Next comes the fun part. You can upload your own artwork, work with a designer, or use an online design tool to build something from scratch. Some tools even let you describe an idea and get design options in seconds.
If you upload a file, quality matters. Vector files such as SVG, AI, or EPS are best because they stay sharp at any size. A high-resolution PNG also works well. Low-quality images can look blurry once they are printed on fabric.
Keep these tips in mind:
- Simple designs with fewer colors often print cleaner and can cost less.
- Make sure the text is easy to read from a few feet away.
- Decide where the design goes: front, back, sleeve, or a combination.
Step 3: Choose Your Shirts, Colors, and Sizes
Now pick the blank shirt. Cotton is soft and classic. Blends feel lighter and resist wrinkles. Performance fabrics work well for sports and outdoor events.
Color matters too. A dark design on a dark shirt can disappear, so choose strong contrast between the ink and the fabric. Then build your size breakdown. Count how many small, medium, large, and extra-large shirts you need. A good rule is to order a few extra shirts in the most common sizes, because last-minute additions happen more often than you think.
Step 4: Get a Quote and Approve Your Proof
Once your design and shirt choices are ready, you will receive a quote. It usually reflects the number of shirts, the printing method, the number of colors, and the print locations.
After you accept the quote, you will get a digital proof. This is a preview that shows your design on the shirt, including the size and placement. Read it carefully. Check every name, number, date, and spelling. Approving the proof is the green light for production, and changes after that point can cost extra or cause delays.
Step 5: Printing Begins
This is where your design becomes real. The printing method depends on your order size, your artwork, and the look you want. Here are the most common options:
- Screen printing: Ink is pushed through a mesh screen, one color at a time. It is durable and cost-effective for large orders with simple designs.
- Direct-to-garment (DTG): A special printer applies ink straight onto the fabric. It works well for detailed artwork and designs with many colors.
- Direct-to-film (DTF): The design is printed onto a film and then heat-pressed onto the shirt. It gives bright colors and works on many fabric types.
- Heat transfer vinyl: Cut vinyl is pressed onto the shirt. It is popular for names and numbers on team jerseys.
If you are not sure which one fits your project, ask your printer. A good team will explain the pros and cons in plain language.
Step 6: Quality Check
After printing, each shirt should be inspected. Staff look for crooked prints, faded areas, stains, or flaws in the fabric. Shirts that do not pass are set aside and replaced. This step protects you from surprises when you open the box.
Step 7: Packing and Delivery
Once every shirt passes inspection, the order is folded, counted, and packed. Some printers can also sort shirts by size or by name for events and teams, which makes handing them out much easier. Just ask before you order.
Your package then ships to your door, and you will usually get tracking details so you know when to expect it. If you are ordering ahead of a holiday or special event, please read our blog on “how to stay ahead of holiday deadlines” to avoid inconveniences.
How Long Does the Whole Process Take?
Timing varies by order size, printing method, and shipping speed. Many bulk orders take about one to two weeks from proof approval to delivery. Large or complex orders may take longer, and rush options are sometimes available. The best move is to place your order early and confirm the timeline before you pay.
Common Mistakes to Avoid
- Using low-resolution artwork that prints blurry
- Guessing sizes instead of collecting them from your group
- Choosing ink colors that blend into the shirt
- Skipping a careful proof review
- Waiting until the last minute to order
To get further information about this, refer to our previous blog here.
Decide suitable place for this –
Decide page and intel,rkink in cta as well.
Final Thoughts
Bulk custom t-shirt orders are not hard when you know what to expect. Plan your order, finalize your design, choose the right shirts, approve your proof, and let the production team handle the rest. Whether you are outfitting a team, promoting a brand, or celebrating a big event, a smooth process leads to shirts you will be proud to wear.
Ready to start? With MyNameT, you can share your idea, your quantity, and your deadline, and get your custom order moving today.